Console Applications
A Console Application is a traditional command prompt application, which usually has one main job to do and takes its parameters from the command line. Often, the way in which the program carries out its purpose can be controlled using optional parameters.
The steps required to create a Toolkit console application from the default Console Application template are detailed in the Getting Started guide.
Here we will take a more detailed look at the specifics of a Toolkit application derived from the ConsoleApplication base class in ConsoleToolkit.ApplicationStyles.
Deriving from ConsoleApplication
using ConsoleToolkit;
using ConsoleToolkit.ApplicationStyles;

namespace SampleConsoleApp
{
    class Program : ConsoleApplication
    {
        static void Main(string[] args)
        {
            Toolkit.Execute<Program>(args);
        }
    }
}
This is the minimum possible Main function. The Toolkit will scan the assembly for a class with the [Command] attribute, from which it will load the command line configuration (see here), and a method with the [CommandHandler] attribute.
Here is an example:
[Command]
[Description("Extract files from archive.")]
class Options
{
    [Positional]
    [Description("The name of the archive file.")]
    public string File { get; set; }

    [Positional]
    [Description("Optional list of files to extract. If no files are specifed, all files will be extracted.")]
    public List<string> ExtractFiles { get; set; }

    [Option("output", "o")]
    [Description("Output to folder. If this option is not specified, output to the current directory.")]
    public string Output { get; set; }

    [Option("list", "l")]
    [Description("List the matching files instead of extracting them.")]
    public bool List { get; set; }

    [Option("help", "h", ShortCircuit = true)]
    [Description("Display help text.")]
    public bool Help { get; set; }

    [CommandHandler]
    public void Handle(IConsoleAdapter console, IErrorAdapter error)
    {
        var data = new[]
        {
              new {Parameter = "Archive", Value = File}
            , new {Parameter = "File List", Value = string.Join(", ", ExtractFiles)}
            , new {Parameter = "Output folder", Value = Output}
            , new {Parameter = "List option", Value = List.ToString()}
        };
        console.FormatTable(data, ReportFormattingOptions.OmitHeadings);
    }
}
In this case the command handler is part of the command class itself. There are several options for the location of command handlers (see here).
Initialisation
Initialisation can be performed in a number of places, and the selection of the correct alternative depends on when you want the initialisation to take place.
- If you want the initialisation to run unconditionally, prior to handover to any Toolkit code running, you can call it before you call
Toolkit.Execute<Program>(args);This is the earliest possible initialisation point and is totally outside of the Toolkit’s control.
using ConsoleToolkit;
using ConsoleToolkit.ApplicationStyles;

namespace SampleConsoleApp
{
    class Program : ConsoleApplication
    {
        static void Main(string[] args)
        {
            //Initialisation code here
            Toolkit.Execute<Program>(args);
        }
    }
}- The
ConsoleApplicationbase class has an overridableInitialisemethod which is called by the Toolkit just prior to validation of the command line parameters. This is a good place to set up the objects to be injected into your command handlers if you are using this feature.
class Program : ConsoleApplication
{
    static void Main(string[] args)
    {
        Toolkit.Execute<Program>(args);
    }

    protected override void Initialise()
    {
        //Initialisation code here
        base.Initialise();
    }
}- If you wish to perform initialisation only if the command line parameters are valid, override
OnCommandLineValid. This method is called before the command handler is executed, and is passed the command options as anobjectreference.
class Program : ConsoleApplication
{
    static void Main(string[] args)
    {
        Toolkit.Execute<Program>(args);
    }

    protected override void OnCommandLineValid(object command)
    {
        //Initialisation code here
        base.OnCommandLineValid(command);
    }
}
Help Text
The ConsoleApplication supports the automatic generation of help text.
By default, a help message will be displayed if the application is run without command line parameters. This text will be built using the command line configuration loaded from the application’s [Command] class. The [Description("...")] attribute can be used to supply descriptive text. See the documentation on command definitions for details.
Here is the text generated from the Options class illustrated above:
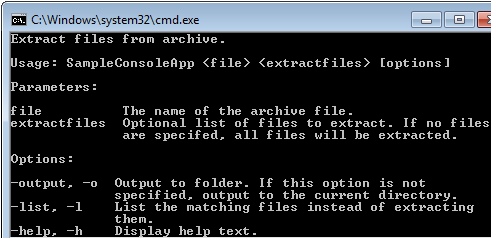
If the application has no mandatory parameters, automatic help will not be displayed by default, because an empty parameter list is valid.
To allow the user to request the help text, an option is traditionally supplied. You can define whatever option you wish for this purpose, and the ConsoleApplication base class just needs to be taught how to determine whether help is requested. This is done by overriding the Initialise method and calling HelpOption. For example:
protected override void Initialise()
{
    base.HelpOption<Options>(o => o.Help);
    base.Initialise();
}
HelpOption is a generic method, parameterised with the type of your [Command] class. It takes a lambda function (or other delegate) that returns a boolean True if help is requested as a parameter.
The option definition in your [Command] class must be specified as a “short circuit” option, which will cause the command line interpreter to stop validating the command line when the option is specified. This is important, because otherwise the user will need to ensure that the command line is otherwise valid before they can view the help text (which pretty much defeats the purpose of giving help).
Here is an example:
[Option("help", "h", ShortCircuit = true)]
[Description("Display help text.")]
public bool Help { get; set; }
This was taken from the options definition above which has a mandatory parameter (File). Without ShortCircuit = true, the following command would give an error message:
sampleconsoleapp -h
However, because the “h” option short circuits the command line validation, it allows help to be displayed.
Post command triggers
You can write code that is triggered by the success or failure of the command handler.
OnCommandSuccess
Override OnCommandSuccess to carry out processing that should only execute if the command executed correctly. If the handler throws an exception, or sets the process exit code (Environment.ExitCode) to a non-zero value, this will not be called. An example of where I have used this is for saving user settings. If the command failed, I didn’t want the settings to change.
protected override void OnCommandSuccess()
{
    Console.WrapLine("Command successful.");
    base.OnCommandSuccess();
}
OnCommandFailure
Override OnCommandFailure to carry out processing that should only execute if the command did not execute correctly. If the handler throws an exception, or sets the process exit code (Environment.ExitCode) to a non-zero value, this will be called.
protected override void OnCommandFailure()
{
    Console.WrapLine("Command failed.");
    base.OnCommandFailure();
}
Exceptions
If the command handler throws an exception, it will, by default, be caught by the toolkit:

Environment.ExitCode will be set to 500.
A custom exception handler can be installed by calling Toolkit.SetCmmandExceptionHandler. For example:
protected override void Initialise()
{
    Toolkit.SetCommandExceptionHandler(ExceptionHandler);
}